Wednesday, December 26, 2012

Our Blog has Moved!!!

In trying to simplify things, our blog has moved!!!  You can now find it linked to our website at:

Please be sure to subscribe to the new blog and stay updated with the world of Boot Camp Babes :D Pin It

Friday, November 23, 2012

Fantastic Food Friday

Want a fresh start post Thanksgiving?  Try my Black Friday Detox Salad:

Ingredients

  • 1 teaspoon extra-virgin olive oil
  • Juice of 1/2 lime
  • 1 small clove garlic, minced
  • Pinch cayenne
  • Coarse salt
  • 1 ripe avocado, halved and seeded
  • 1/2 yellow bell pepper, stem and seeds removed, diced
  • 6 cherry tomatoes, halved
  • 1 scallion, thinly sliced
  • 1 tablespoon freshly chopped cilantro, plus leaves for garnish

Directions

  1. In a small bowl, whisk together oil, lime juice, garlic, and cayenne. Season with salt.
  2. Scoop out meat from avocado halves and chop. Transfer to a bowl and add bell pepper, tomatoes, scallion, and cilantro.
  3. Drizzle with dressing and season with salt. Gently stir to combine. Garnish with extra cilantro.
  Pin It

Friday, November 16, 2012

Fantastic Food Friday


Sesame Chicken and Noodles

Ingredients

1/3 cup rice vinegar
1/3 cup thinly sliced green onions
2 tablespoons honey
1 tablespoon reduced-sodium soy sauce
1 tablespoon grated fresh ginger
2 teaspoons Asian garlic-chili sauce
2 6 ounces refrigerated grilled chicken breast strips
12 ounces dried udon noodles or whole-wheat spaghetti
3 tablespoons toasted sesame oil
2 medium yellow, red and/or orange sweet peppers, cut in bite-size strips
Fresh cilantro


Directions

1. In medium bowl stir together vinegar, green onions, honey, soy sauce, ginger, and garlic-chili sauce. Add chicken; stir to coat. Set aside to allow flavors to meld.

2. Meanwhile, in large saucepan cook noodles in boiling water about 8 minutes until just tender. Drain noodles well and return to saucepan. Drizzle with oil and toss to coat. Add chicken mixture and toss to combine.

3. Transfer to bowls. Top each with pepper strips and cilantro. Makes 6 servings.

Nutrition Facts (Sesame Chicken and Noodles)
Servings Per Recipe 6,cal. (kcal) 391, Fat, total (g) 11,chol. (mg) 37, sat. fat (g) 2,carb. (g) 51, fiber (g) 4, pro. (g) 21, vit. A (IU) 292, vit. C (mg) 115, sodium (mg) 718, calcium (mg) 40, iron (mg) 3, Percent Daily Values are based on a 2,000 calorie diet


Pin It

Friday, November 9, 2012

Fantastic Food Friday

The Boot Camp Babes Green Smoothie Challenge is well under wayNow that your fridge is stocked with healthy greens, try experimenting with them in your day-to-day cookingAdding a variety of leafy greens to your meals in dishes other than just another salad is a great way to boost vitamin intake naturallyEating should be about more than just filling up.  Fuel up!

 Spaghetti with Braised Kale

Ingredients

1 lb lucinato kale (about 2 bunches), large center ribs and stems removed, cut cross-wise into 1/2 in slices.
3 tablespoons olive oil, divided
1 medium onion, finely chopped (about 1 1/2 cups)
8 large garlic cloves (thinly sliced)
1/2 lb spaghetti (try whole grain or brain rice options)
2 teaspoons fresh lemon juice
Finely grated Parmesan cheese

Directions

Rinse kale.  Drain; transfer to bowl with some water still clinging.    
Heat two tablespoons of olive oil in large pot over medium heat.  Add chopped onion, and cook until soft and translucent - stirring occasionally, about 6 minutes.  Add sliced garlic and sprinkle with salt.  Cook until onion is golden brown - stirring occasionally, about 5 minutes.  Add kale and remaining 1 tablespoon olive oil and toss until wilted, about 3 minutes.  Cover pot and reduce heat to medium-low.  Continue cooking until kale is very tender, stirring occasionally and adding water by teaspoonfuls if dry, about 20 minutes.

Meanwhile, cook spaghetti until tender, but still firm to bite.  Drain, reserving 1/4 cup cooking liquidAdd cooked spaghetti to kale mixture in pot.  Add lemon juice and 2 tablespoons reserved cooking liquid.  Toss to combine, adding more liquid by teaspoonfuls if dry.  Sprinkle spaghetti with grated Parmesan cheese and serve.     


Pin It

Thursday, November 1, 2012

28 Day Green Smoothie Challenge

For the November session (Nov 5- Dec 3) we will be holding the  

28 Day Green Smoothie Challenge
 All you have to do is add a green smoothie to your diet every day for the 28 days - it can be a meal replacement or just add it on to your day - just be sure to have one every day.  The only rule is that it must contain 1-2 Cups of leafy greens.  I'm a fan of kale and spinach, but there are many varieties of leafy greens to choose from and now that the Farmer's Markets are all opening up again, you should have no trouble finding:

1.  Kale
2.  Collards
3.  Turnip Greens
4.  Swiss Chard
5.  Spinach
6.  Mustard Greens
7.  Broccoli
8.  Cabbage
9.  Watercress
10. Arugula

Get creative!  Try different types of greens with different types of fruits.  Mix in some peanut butter or some protein power. make it sweet with maple syrup, make it savory with ginger - the sky's the limit!  If you're not into being creative, here is a list of 30 that should help you through the challenge.  My go-to smoothie recipe is one I found on Pinterest and modified a bit:

The Green Power Smoothie


Ingredients:
2C Leafy Greens (I use Spinach and Kale)
1/2 C Chunk Pineapple
1 Banana
1/2 C Plain Greek Yogurt
3/4 C Almond Milk
1/2 C Ice
2 Tbsp Chia Seeds

Combine all of the ingredients in the blender and blend well. 
Pour into your favorite tumbler and enjoy :)

Why are we doing this challenge?
There are so many benefits to green smoothies and we want to use this as an opportunity to kick-start us all into a great habit and clean up our bodies moving into the holiday season.  The health benefits of green smoothies include:  

1 – Natural Weight Loss
Drinking a green smoothie is an effective was to lose weight since it provides the nutrition, vitamins, minerals, healthy carbohydrates, fiber and low fat whole food that you need to lose weight quickly and effectively without starving yourself.
2 – Increased Consumption of Fruits and Vegetables (Especially Greens)
The American Cancer Society recommends 5-9 servings of fruits and vegetables each day to prevent cancer and other diseases and green smoothies are a quick and convenient way to get your vegetables while masking the flavor with fruit.
3 – Easy Digestibility and Nutrient Absorption
Your blender unlocks the nutrients and maximizes their delivery to your body more than chewing any salad could and smoothies are quicker and more convenient, especially when you are on the go.
4 – Antioxidants
Green smoothies are high in antioxidants and phytonutrients, giving your body defense against disease and optimizing your health and fitness.
5 – Increased Energy
Smoothies provide a powerful boost of vitamins, minerals, antioxidants and other nutrients without bogging down your digestive system, giving you more energy to get things done and enjoy your day.
6 – Mental Clarity and Focus
With a healthier diet comes greater mental clarity and focus. Maybe use green smoothies to replace your morning coffee ritual and experience greater alertness, energy and reduced anxiety and nervousness.
7 – Increased Fiber Intake
Unlike juice, green smoothies use the whole fruit and vegetable so that you get all the fiber and nutrition. Fiber is essential for good colon health and it keeps your bowels in working order.
8 – Clearer Skin
Smoothies are high in fiber and allow your body to eliminate toxins the right way instead of through your skin, leading to a clearer, more radiant appearance.
9 – Reduce Cravings
Green smoothies reduce cravings for junk foods, unhealthy sweets, salt and fats.  You will be creating a new craving for fruits and vegetables instead.
10 – Rich With Chlorophyll
Green smoothies are rich with chlorophyll which some natural health experts say enhances the immune system, purifies the blood and rejuvenates the body.
11 – Alkalizing
Fruits and vegetables are alkaline foods that help maintain a proper pH level in your body.  A low pH  level of the blood can cause your body to leach calcium from your bones to neutralize it, increasing the risk of osteoporosis. 


So go, make those smoothies and enjoy how they taste and how you feel.  Please feel free to post in the comments section or on Facebook, some of your all-time favorite recipes or maybe a new favorite that you discovered during this challenge, to share with everyone :) 

Happy blending!

Pin It

Friday, October 19, 2012

Fantastic Food Friday

Breakfast of Champions

Apples and Cinnamon Breakfast Quinoa
courtesy of skinnytaste: full story 

Servings: 4 • Serving Size: 1 bowl (1/4 of recipe) • Old Points: 6 pts • Points+: 8 pts
Calories: 316 • Fat: 8 g • Carbs: 53 g • Fiber: 6 g • Protein: 9 g • Sugar: 20 g
Sodium: 35 mg
 
Ingredients:

  • 1 cup dry quinoa, rinsed well
  • 1 1/2 cups water
  • 1 tsp cinnamon + more for sprinkling
  • 2 tsp vanilla extract
  • 1/2 cup unsweetened applesauce
  • 1/4 cup golden raisins
  • 1 cup warmed fat-free milk for drizzling (non-dairy milk is fine)
  • 1 gala apple, peeled and diced
  • 1/4 cup pecans, chopped

Directions:

Combine quinoa, water, cinnamon and vanilla in a small saucepan and bring to a boil. Reduce to a simmer, cover, and let cook for 15 minutes until quinoa can be fluffed with a fork.

Divide cooked quinoa between four bowls then stir in apple sauce, raisins, and pour in warmed milk. Top with fresh cut apples and pecans and a dash of cinnamon.


Makes 4 servings. You can divide the recipe to make 2 servings.
  Pin It

Friday, October 12, 2012

Fantastic Food Friday

Early morning boot camp in the crisp pre-dawn air has me dreaming of fall... and comfort food.  This sandwich is on my list for post Thanksgiving turkey leftovers.  


Brie, Pear, and Mustard Grilled Cheese

2 slices whole-grain bread
1-2 tsp whole-grain mustard 
1 oz Brie, sliced
1/4 pear, cored and sliced
1 Tbsp extra-virgin olive oil
*leftover turkey - optional, but highly recommended 

1.  Heat a cast-iron skillet over medium-low heat.  Spread both slices of bread with mustard and top one slice with Brie and pear.  Top with remaining slice and press together gently.  Generously brush both sides of sandwich with olive oil.

2.  Place sandwich in skillet and cover with a piece of foil.  Place a half-filled teakettle or a heavy skillet on top to weigh it down and cook until bread is golden and cheese begins to melt -- 1 to 2 minutes per side.  Serve warm.
Pin It

Friday, October 5, 2012

Fantastic Food Friday

Liquid Gold...?
 
Known in health circles as "liquid gold" and "nature's multi-vitamin", raw honey is packed with healing properties -- and it tastes fantastic! Vitamins such as B1, B2, B3, B5, B6, and even antioxidant-rich vitamin C are found in raw honey. It also contains minerals like magnesium, potassium, calcium, sulphur, and phosphate.  

With antibacterial and anti-fungal and immune-boosting anti-viral properties raw honey has been used in traditional medicine for the treatment of ulcers, diarrhea, bronchitis, and gastrointestinal issues.  Raw honey is used in a whole host of home health remedies from treating morning sickness, sore throats and sinus problems to serving as a natural sleep aid.  

How I am using it:  As a substitute for my usual coffee beverage when trying to cut back on caffeine,  for a soothing after dinner drink, and as a healthier alternative to hot chocolate for my kids.  


Raw Honey Milk Steamer


Simply add a heaping teaspoon of organic raw honey to steamed (or warm) milk of your choice.  Add a little vanilla and sprinkle with cinnamon for a hint of fall.  You may not even miss your usual cup of coffee!

  Pin It

Monday, October 1, 2012

My First Olympic Triathlon - Motivational Monday

On Sunday, September 23, 2012 I participated in my very first triathlon and true to form, rather than starting with a Sprint distance, I went right for the Olympic.  This race was at Tempe Town Lake and consisted of a 1500m swim (that's about a mile), a 26 mile bike ride, and a 6.2 mile run.  I decided to do this event because I've always been a person who works out and stays fit, but generally doesn't practice or train for anything specific.  I blame it partly on good genes and partly on laziness.  With an event like this I knew that I HAD to train and I was determined.

 Tempe Town Lake - The Start of the Olympic Triathlon


The Swim
I've always been a swimmer.  My mom was a lifeguard and I grew up around pools.  As a teenager I did some life-guarding and even taught swimming lessons.  What I never have been is a fast swimmer, so I decided to join the Phoenix Master's Swim Club.  It was an eye-opening experience.  I knew I was slow, but compared to these people I was really, really slow.  Men and women of all shapes and ages were making me think I belonged in the kiddie pool!  However, week after week I kept going.  I did the drills (even though I had no idea what they were talking about for the first couple weeks) and I swam lap after lap.  It was frustrating for me because running is something I can just do and swimming is something that I have to practice and practice and practice.  I even did a practice lake swim (and had a full-out panic attack), but tried again a couple days later with the new attitude that my goal wasn't to win the swim, it was just to finish it and still feel good for the ride and the run.  All that practice paid off!  I didn't win the swim by any means, but I swam front stroke the entire way (even sprinted the last 100yards) and felt fantastic coming out of the water.  Finishing that swim was a huge boost of confidence that I needed to motivate me on the bike!

 Coming in for the end of the swim (that's me in the red cap).

The Bike
Again, I've always ridden a bike.  I used to commute to school and to work all the time...but that was a short and leisurely commute. I needed to learn to ride a road bike (it seems easy, but the clipped in pedals, skinny tires, and aerodynamic body position is more difficult than I estimated).  A very awesome friend who also happens to be a multiple Ironman competitor lent me a bike and inspired me to do this.  The bike was great but I started noticing with the training that my back would ache after long rides, but I ignored it and figured it was just part of getting used to riding.  Finally, a few weeks before the race I decided to get my bike properly fitted at a bike shop and discovered that I was badly arching my back.  A few simple adjustments made the ride feel so much better and I wish I had done it sooner, because I'm still trying to heal the tightness I created in my back.  The bike segment of the race is as much technical as it is physical - learning to change flats, good body position, proper equipment, and using the ride time to refuel and rehydrate.  In the end, the bike leg was my favorite and I cut 20min off my expected time!  I especially loved it because the race route consisted of 6 mini loops, which means I got to ride past my amazing cheering section six times :D

 The Start of the Bike Leg


The Run
I'm a runner.  I love to run.  I do not however like to run for no reason.  I run when I play Ultimate Frisbee, I run in races, but I have a really hard time training for a run (especially by myself).  The biking and swimming were my weakest parts, so I spent the bulk of my training on those and then focused on transitioning from the bike when I did the run training.  The unexpected part of the run were the "lead legs" - I was told that after the swim and bike, my legs would feel like lead, but it was unreal.  Both of my feet were asleep and my legs were tired and the result was a sensation similar to carrying 10lb weights as shoes.  It was a 6 mile run and it took me almost 4 miles to finally feel my feet and pick up the pace.  I felt really great coming in the last 2 miles and even past a friend coming up over the Mill Ave bridge.  As I ran over the bridge I just couldn't stop smiling.  I was playing the race over in my head and I was so very proud of what I was about to accomplish.  The pure joy of it all provided me with an extra jolt of energy as I turned the last corner, heard my friends cheering at me, and cruising in to finish the race... 15min ahead of what I expected!!!

 Finishing Strong at the End of the Run

Both the training and the race were challenging and totally rewarding.  I was pushed to my limits physically, I met new friends at Phoenix swim club, I found a new love in biking, and I realized how my diverse training at Boot Camp helps me in so many different activities.  I can't wait for the next one ... maybe even a half Ironman ;-p

Finished with a Smile


Pin It

Friday, September 28, 2012

Fantastic Food Friday

Fresh, Flavorful and Fantastic!

Adding fresh herbs to your recipes is a quick and easy way to transform ordinary dishes into exciting meals without adding extra fat, salt or sugar. 


Lemongrass Cilantro Chicken

Adapted from: Food & Wine 2012
Serves 4 | Prep Time: 15 minutes | Cook Time: 15 minutes

Ingredients:
4 boneless chicken breast halves with skin

Marinade:
2 stalks lemongrass, white part only, cut into 1-inch pieces, pounded and bruised
1 cup packed chopped cilantro
4 large shallots, coarsely chopped
8 tablespoons (~120ml) vegetable oil


Honey Dipping Sauce:
5 tablespoons (~75ml) water
1 1/2 teaspoons sugar (if desired)
2 teaspoons honey
1/4 teaspoon crushed red pepper
1 tablespoon white vinegar
1 tablespoon fish sauce

Salt and freshly ground black pepper to taste
1 cup small mint leaves for garnishing
1 lime, sliced for garnishing


Method:
Combine the ingredients for the Marinade in a shallow dish. Transfer the chicken into the dish and coat well with the Marinade. Cover the dish and marinate overnight.
Prepare the Honey Dipping Sauce by combining the water, sugar and honey in a small saucepan and heat it over medium heat. Stir until sugar dissolved. Pour the mixture into a bowl and add the crushed red pepper. Let it cool to room temperature before adding the white vinegar and fish sauce. Add salt and freshly ground black pepper to taste. Refrigerate until use.

To grill the chicken, scrape the marinade off the chicken breast. Season the chicken with salt and freshly ground black pepper to taste. Grill the chicken with skin side down for about 3-4 minutes, until the skin is lightly burned and crisp. Reduce the heat or move the chicken to another part of the grill with lower heat. Let it cook for another 2 minutes. Turn the chicken over and cook until desire tenderness, about 4-5 minutes.

Let it rest for 3-5 minutes before slicing the chicken. Serve with warm steamed rice.

Pin It

Wednesday, September 26, 2012

What Are You Eating?

Do you REALLY understand the things that you are eating?
Do you REALLY understand the “foods” that you are putting in your body?
The best goal to have is to consume foods that will nourish and fuel the body.
Yes we are all human and may crave some of the most unhealthy things to eat…BUT there is a time and a place to enjoy them in MODERATION!
Reaching your health and fitness goals can be done best by eating right and sticking with your workout schedule.


Happy Wednesday!


Pin It

Friday, September 21, 2012

Soup's On

Fantastic Food Friday

With chickpeas for fiber to keep hunger at bay -- nearly 11 grams per cup, in fact -- Rich basil pesto for anti-inflammatory properties, blood sugar regulation and amazing flavor, and fire roasted tomatoes loaded with the cancer fighting antioxidant powerhouse, lycopene; this fantastic soup will fuel your run, jump start weight loss and help maintain all around wellness. 

Tomato Chickpea Pesto Soup

Ingredients
1/2 diced medium onion
1 tablespoon olive oil
1 minced garlic clove
1 28-ounce can fire-roasted crushed tomatoes
1/3 cup water
1 teaspoon sugar
1/2 teaspoon salt
black pepper
1 15-ounce can drained, rinsed chickpeas

basil pesto - jarred or make your own basil and walnut pesto

Directions

1.
In a pot, saute 1/2 a diced medium onion in 1 tablespoon olive oil over medium heat till soft. Add 1 minced garlic clove; cook 30 seconds. Add one 28-ounce can fire-roasted crushed tomatoes and cup water; bring to a boil. Add 1 teaspoon sugar, 1/2 teaspoon salt, and black pepper.

2.
If you like a smooth soup, puree mixture in a blender. Transfer back to pot. Add one 15-ounce can drained, rinsed chickpeas. Cover and simmer 10 minutes. Top each serving with a dollop of jarred basil pesto or, even better, go here  for my favorite homemade pesto recipe!
 

Nutritional Facts per serving CALORIES 299.6 CAL
FAT 8.9 G

SATURATED FAT 1.5 G

CHOLESTEROL 1.7 MG

SODIUM 1117.7 MG

CARBOHYDRATES 48.7 G

TOTAL SUGARS 2.2 G

DIETARY FIBER 10.5 G

PROTEIN 11.2 G

Pin It

Friday, September 14, 2012

Fantastic Food Friday

Wrap up dinner with this low cholesterol, high calcium, high fiber, protein packed recipe courtesy of Eating Well.

Creamy Avocado and White Bean Wrap


Ingredients

  • 2 tablespoons cider vinegar
  • 1 tablespoon canola oil
  • 2 teaspoons finely chopped canned chipotle chile in adobo sauce, (see Note)
  • 1/4 teaspoon salt
  • 2 cups shredded red cabbage
  • 1 medium carrot, shredded
  • 1/4 cup chopped fresh cilantro
  • 1 15-ounce can white beans, rinsed
  • 1 ripe avocado
  • 1/2 cup shredded sharp Cheddar cheese
  • 2 tablespoons minced red onion
  • 4 8- to 10-inch whole-wheat wraps, or tortillas

Preparation

  1. Whisk vinegar, oil, chipotle chile and salt in a medium bowl. Add cabbage, carrot and cilantro; toss to combine.
  2. Mash beans and avocado in another medium bowl with a potato masher or fork. Stir in cheese and onion.
  3. To assemble the wraps, spread about 1/2 cup of the bean-avocado mixture onto a wrap (or tortilla) and top with about 2/3 cup of the cabbage-carrot slaw. Roll up. Repeat with remaining ingredients. Cut the wraps in half to serve, if desired.

Nutrition

Per serving: 346 calories; 17 g fat ( 4 g sat , 9 g mono ); 15 mg cholesterol; 44 g carbohydrates; 12 g protein; 13 g fiber; 462 mg sodium; 491 mg potassium.
Nutrition Bonus: Vitamin A (60% daily value), Vitamin C (45% dv).
Carbohydrate Servings: 2
Exchanges: 2 1/2 starch, 1 vegetable, 1 lean meat, 2 fat

Pin It

Tuesday, September 11, 2012

Wednesday Wisdom -Sometimes you just need to Take a Break


For most of us, the hardest thing to do when we have an injury is to TAKE A BREAK!  Especially when we're on track and really sticking to a workout routine.  Mentally, we want to keep going.  We want to push through the pain and hope it goes away.  I am personally guilty of this regularly. 

BUT...

the truth of it is - if you give your body the time it needs to heal, you will be helping yourself in the long run.  For example, if you jack your back (I did this two weeks ago riding a bike that wasn't fitted properly) you can keep exercising through the pain and you'll slowly feel like the pain is decreasing, until one wrong move and you jack it again.  This cycle can go on for weeks, even months.  Whereas if you take a couple weeks off and let it heal properly (which I ended up doing ... not by choice, but by circumstance), you can get back at your workouts full force when you're better.  Now you've only missed 2 weeks instead of the off and on for eight months of trying to fight through.  I really believe it takes more strength to hold back and rest than to push through and hurt yourself.  But what do I know ... I'm just a trainer ;-)


Pin It

Friday, September 7, 2012

Fantastic Food Friday

Got Smoothie?

Interested in boosting weight loss with meal replacement shakes, but not so hip on the chemicals, additives and mystery ingredients hiding in the commercially manufactured products?  Making your own healthy meal replacement smoothie at home is fantastically simple and delicious!  Two to try:


From TODAY show nutrition expert, Joy Bauer:  

"My homemade Power Protein Smoothie works perfectly as a stand-alone breakfast or lunch. It has plenty of filling protein to curb your appetite, plus lots of colorful frozen berries for fiber, vitamins, minerals, and natural sweetness. To make it, simply blend together ¾ cup milk (skim, soy, or almond), ½ banana, 1 cup frozen mixed berries, 1 scoop vanilla whey protein powder, and 3 to 5 ice cubes until smooth and frothy. One generous, 2-cup serving provides 305 calories and 31 grams protein."


Energy Boosting Smoothie via Dr. Oz:

Ingredients  
Makes 2 servings  
2 tbsp 100% pure cocoa powder  
2 tbsp creamy natural peanut butter  
1 medium ripe banana  
8 oz non-fat vanilla Greek yogurt  
4-6 ice cubes  
Dash of cinnamon  

Directions  
Pour peanut butter, cocoa powder, Greek yogurt and ice cubes into blender and mix at high speed.  Slice banana, add into mixture, and re-blend. Pour smoothie into two cups and serve. Sprinkle dash of cinnamon on top for extra flavor.

Nutrition Facts
 
245 calories per serving  
16 g protein


TIP:  To give your smoothie an extra energy kick, try adding concentrated green tea or 1/2 cup brewed coffee before blending (brew up your own tea and coffee the night before and store in the refrigerator for the next day's smoothies.) Pin It

Monday, September 3, 2012

Motivational Monday

Motivational Monday…
Starting YOUR health and fitness journey is about YOU
It is not about ANYONE ELSE BUT YOU!
YOU have to work hard.
No it will not happen overnight…
yes there are some days you will feel like slacking or giving up…
YOU CAN DO IT!
Keep your eyes on your goal and make it happen!
 

One Day at a Time…
one day at a time…
one workout at a time…
one meal at a time…
one pound at a time…
You CAN achieve your health and fitness goals!
It takes time but you can do it!


Happy Monday!
Pin It

Friday, August 31, 2012

Fantastic Food Friday

When it comes to weight loss and fitness goals, we often fall into a cycle of focusing on what we "can't do" -- "I just can't seem to lose those last 5 or 10 lbs." or "I can't run as fast or as far as everyone else." My words of wisdom for those feeling "stuck" in life: No matter how impossible your struggle or goal may feel today -- a simple shift in focus from "I just can't do it" to "Maybe I can't do that, but I can do this... right now... today" is all it takes to take a step in the right direction.


Maybe we can't suddenly lose 5 lbs or run a marathon straight off the couch, but there is always something we can do.  My suggestion for today:

EAT A RAINBOW

Today, focus on fruits and vegetables -- coloring your plate with a rainbow of choices -- knowing that each color has a different and necessary set of nutrients that your body needs to stay healthy.  Added bonus -- research in both adults and children suggests that increased intake of fruit and vegetables promotes weight management. 


Fantastic Rainbow Recipe of the Day: Colorful Slaw Salad

Ingredients

  • 1/4 cup honey
  • 1/4 cup lime juice
  • 2 Tablespoons vinegar
  • 1 Tablespoon ground cumin
  • 1/2 teaspoon salt
  • 1/4 teaspoon ground pepper
  • 1/3 cup olive oil
  • 3 cups shredded red cabbage
  • 1 cup grated carrot
  • 4 thinly sliced green onions
  • 1 cup sugar snap peas, sliced
  • 1 sliced red pepper
  • 1 sliced yellow pepper
  • 1 cup chopped cilantro

Directions

  1. In a small bowl, whisk together honey, lime juice, vinegar, cumin, salt, and pepper. Slowly whisk in the olive oil. Set aside.
  2. Chop vegetables to bite size.
  3. In a large bowl, combine red cabbage, carrots, green onions, sugar snap peas, red pepper, and yellow pepper. Give a toss and add cilantro.
  4. Pour the dressing over the slaw and toss until coated. Check for seasoning and add salt and pepper as needed.
Pin It

Monday, August 27, 2012

Motivational Monday - The 80/20 Rule

If you are looking for the solution to weight loss, it's much more simple than you think:


The 80/20 Rule
80% of the time:
  • Eat healthy, balanced, delicious, natural, whole foods
  • Exercise daily and make sure to get that heart rate up
  • Live a balanced life
  • Keep your portion sizes reasonable 
  • Pay attention to what and how much you eat
20% of the time:
  • Give yourself a break!
  • Allow some"forbidden" food
  • Miss your workout
  • Enjoy the social aspect of eating
The 80/20 principle will not leave you feeling deprived.  You won't get instant results, but you will be changing your lifestyle habits, which leads to long-lasting results.  Don't expect perfection from yourself and then avalanche into bad habits when you can't achieve that perfection.

You will experience slip-ups, we all do, but just get back on track right away ... don't dwell on the past, move forward towards your goal.  Sometimes you'll even stay on track 90% of the time and then you can really pat yourself on the back.  All or nothing plans set you up for defeat, so just start making healthy choices 80% of the time and you will see results!


Pin It

Friday, August 24, 2012

Fantastic Food Friday

Because every girl deserves a little chocolate in her day...  and because I was completely sold after seeing this recipe for healthy Triple-Decker Chocolate Peanut Butter Fudge.  Click through for more fantastic healthy dessert recipes.


Triple-Decker Chocolate Peanut Butter Fudge:  
[no bake, high fiber/protein, GF, vegan]
(makes sixteen 2" squares)


Chocolate Oat Fudge Layer:
  160g (1/2 cup + 2 tbs) Coconut Butter, melted (you can make this at home)
  1/4 cup Light Coconut Milk, canned
  42g (2 tbs) Agave Nectar
  1 tsp Vanilla Extract
  1/8 tsp Salt
  32g (1 scoop) Vanilla Protein Powder
  30g (6 tbs) Regular Cocoa Powder (unsweetened)
  96g (1 cup) Rolled Oats (old fashioned, gluten free if you like)


PB Fudge Layer:
  64g (2 scoops) Vanilla Protein Powder
  84g (1/4 cup) Agave Nectar

  64g (1/4 cup) Natural Peanut Butter (no sugar/salt/oil added)


Chocolate-PB Fudge Layer:
  64g (2 scoops) Chocolate Protein Powder
  15g (3 tbs) Regular Cocoa Powder (unsweetened)
  105g (1/4 cup + 1 tbs) Agave Nectar
  64g (1/4 cup) Natural Peanut Butter (no sugar/salt/oil added)

Directions:
1.  Line an 8" brownie pan with parchment paper both ways and set aside (I used tin foil because I ran out of parchment, but parchment would be better)

2.  For the Chocolate Oat Fudge Layer- in a large bowl, whisk together the melted coconut butter, coconut milk, agave, vanilla and salt.  Whisk in the protein powder, then whisk in the cocoa powder.  Fold in the oats.  Flatten mixture into the brownie pan and freeze while you make the next layer (freeze for at least 30 minutes, or until completely firm).

3.  For the PB Fudge Layer-  in a medium bowl, add the protein powder and top with the agave and peanut butter.  Stir together until all powder has been absorbed (it should not be too dry/crumbly, it should be moist enough to roll into a ball).  Scoop this into the brownie pan, spread to the edges of the pan and flatten (use a pastry roller if you have one, otherwise, put your hand in a sandwich bag and spread it manually).  Refrigerate while you make the next layer.

4.  For the Chocolate-PB Fudge Layer-  In a medium bowl, add the protein powder and cocoa powder and mix.  Top with the agave and peanut butter.  Stir until all powder has been absorbed (it should be a little more moist than the PB layer, but not by too much).  Scoop this into the brownie pan, spread to the edges and flatten (again with the pastry roller or sandwich bag).  Freeze for 30 minutes, then slice.  Serve chilled.
Pin It

Monday, August 20, 2012

Motivational Monday

its all about YOUR MOTIVATION!

When trying to make drastic lifestyle changes it can be very hard!
BUT the only one who can make these changes are you!
Make sure to set reasonable goals for yourself!
And do not lie about the good/bad things you ate…
or the workouts you did/didn’t do!
Lying only hurts you from not allowing you to achieve your goal!
Keep yourself motivated and work hard!
You will reach your goal!!


Happy Monday!
Pin It

Friday, August 17, 2012

Fantastic Food Friday

Maybe it's the relentless heat of the Arizona summer making me yearn for signs of Autumn. With September right around the corner, this former midwestern girl is nostalgic for the giddy feeling of "sweater weather" and changing leaves.  This may explain my recent infatuation with homemade granola.  I can't get enough of the stuff.  Crunchy, chewy, and slightly sweet with hints of cinnamon and vanilla... warm from the oven... so very reminiscent of fall in the midwest.  I'm eating mine for breakfast and dessert with Greek yogurt, warm peaches.

Visit for a nice discussion on the health benefits of healthy granola for weight control, lower cholesterol and more: Health Benefits of Granola.


Simple Granola


Ingredients:
4 cups rolled oats (not instant)
1 cup raw almonds, chopped
1.5 cups flaked coconut (not shredded)
1/4 tsp. finely ground sea salt 
1/3 cup liquid honey (or maple syrup, agave)
4 Tbsp. coconut 
Dash of vanilla extract (optional)
Sprinkle with Cinnamon (optional)

Directions:
1. Preheat over to 350°F.
2. In a small saucepan over low-medium heat, whisk oil and honey together.   Add vanilla extract if desired.
3. In a large bowl combine oats, almonds, coconut, and sea salt. 
4. Pour oil and honey mixture over dry ingredients and stir very well to coat. Place on a cookie sheet.  Sprinkle with cinnamon if desired.  Bake for 10 minutes; remove from oven and stir. Place back in oven but remove and stir every 5 minutes or so until the oats are golden brown (approx. 25-30 minutes).  Keep an eye on it as it bakes.  Ovens vary, and you do not want to overcook. 


Pin It

Wednesday, August 15, 2012

Wednesday Wisdom

Wednesday Wisdom
Spaghetti Sundays…
I grew up attending MANY of these dinners!
From the garlic cheese bread…unlimited meat balls…and you can not forget to mention the variety of desserts that have been offered!
Today, I am going to share some tips on how to make your next Spaghetti Sunday (or Monday…Tuesday…or whatever day of the week!)
Change your pasta!
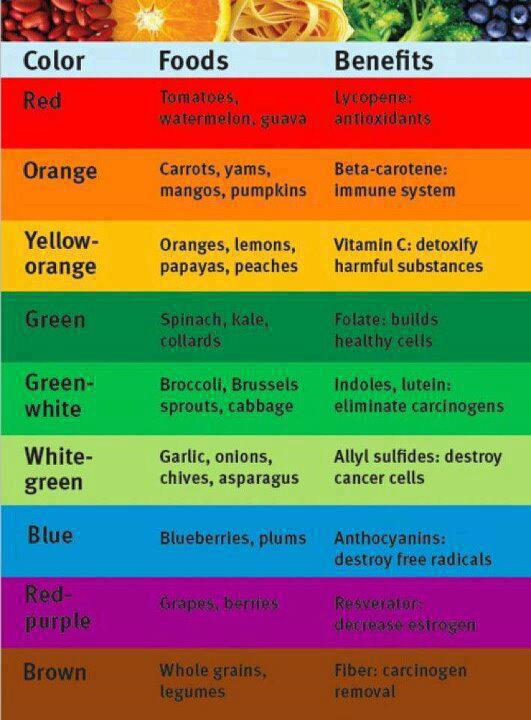
Have you ever considered using a different types of noodles? One of the best options you can try is whole wheat pasta! It should not cost you any more (and if it does it should not cost you too much more) to buy whole wheat noodles. I know that my local grocery store now carries many different types of whole wheat pasta noodles! From angel hair pasta to linguine noodles. I have even found bow tie noodles as well as elbow shaped noodles! You can find any traditional noodle in the whole wheat option. NOTE: there should be two options at your store. There is WHOLE WHEAT and WHOLE GRAIN pasta. Both are better for you than the regular flour pasta options. They have more fiber and they overall have more nutritional benefits. The only difference it that whole wheat is made of the whole wheat grain. The Whole grain option is made with the whole grain. 
Change your meat!
I know that some families add meat to their pasta sauce to make the spaghetti more filling. Most people use regular beef. BUT have you ever considered using 98% lean beef? Or how about ground turkey? Or maybe even consider ground chicken? All of those are a healthier and leaner option than regular ground beef.
Watch your sauce!
Regular tomato sauce is the best option for your family spaghetti meals. Creamy sauces have more ingredients which result in more calories. As a golden rule in eating healthy…try to stay away from sauces (and even salad dressings) that are creamy and thick! Those option pack more calories and are not as healthy for you. Also, try to find low sodium sauces to help cut back on the sodium intake for that meal.
Watch your portion sizes!
One of the top problems with weight gain is consuming more calories than you should during your meal! Try to portion out the correct sizes of pasta, sauce, and anything else you serve during the meal to help your family realize the importance of correct portion sizes. I know how easy it is to pile on the pasta and drown it in sauce! But, preparing your plate that way puts 3…4…or even MORE portion sizes than you should be consuming during that meal.
Watch how much bread you make!
Garlic bread is a staple product with spaghetti meals! And yes it is OK to have them with your meal! BUT here are a few tips to make your bread serving a little better
Try having whole wheat bread instead of the regular white flour bread. This is the healthier options for bread and can also help cut back the calories. Also, do not use as much butter!!! Try using olive oil or an olive oil spray to lightly spray the tops of the bread to allow them to get brown. Try using a low sodium garlic seasoning to help add the desired flavor for your bread. And last but not least, do not forget to create the right portion sizes of bread that you hand out at the dinner table.
Don’t forget the sides!!
Lastly, you can not forget to have some healthy side options available to have with your meal. You can try things like spinach, green beans, peas, corn, squash, small side salads….or practically anything else you and your family would like. I always suggest having two side options to go with your pasta and bread. This will allow for a more well-rounded meal, and the change to get other needed nutrients in their meal.

Dessert can be fun and low-calorie as well! Try making jello or a low-calorie pudding (with a dollop of whip cream!) There are dozens of inexpensive and low-calorie dessert options for you to cook for dessert!
I hope that these tips were helpful! There is always many different things you can alter to help make your weekly family meals a healthier meal option!

Happy Wednesay!
 
Pin It